
How to Use French Nail Tip Guides are small adhesive stickers that act as a stencil on your nail. You place one at the point where you want your white tip to begin, paint over the exposed area, and peel the guide off to reveal a clean, crisp smile line. They are the single fastest way to get a salon-quality French manicure at home, even if your hands are not perfectly steady.
This guide walks you through exactly how to use french nail tip guides with regular nail polish, gel polish, and polygel. It also covers how to choose the right guide shape, fix the most common mistakes, and get your manicure to last longer.
Types of French Nail Tip Guides
Before you open the packet, it helps to understand which type of guide you have and what it is designed to do.
| Guide Type | Shape | Best For | Polish Compatibility |
| Classic round | Curved C-shape | Traditional French look | All types |
| Straight edge | Flat line | Modern or square French tips | All types |
| Deep V / chevron | V-shape | Bold, dramatic tips | Regular & gel |
| Micro French | Narrow curved | Short nails, thin tips | All types |
| Oval / almond | Wider curve | Almond and coffin nail shapes | All types |
Choosing the wrong shape is one of the most common beginner mistakes. If your nails are short, use a micro French guide. If your nails are square, a straight-edge or classic round guide works well. If your nails are almond or coffin-shaped, pick an oval guide that follows the natural flare of the nail.
What You Need Before You Start

- French nail tip guides (pack of stickers)
- Nail polish or gel polish in your tip color, usually white or off-white
- A sheer nude or pink base color
- A base coat and top coat
- A UV/LED lamp if you are using gel polish
- A thin angled nail art brush
- Acetone or gel cleanser on a small brush for cleanup
- Cuticle oil for finishing
- Tweezers for handling guides without touching the adhesive
Step 1: Prepare Your Nails Properly
The way your nails are prepped determines how long the manicure lasts. Do not skip any of these steps.
- Wash your hands thoroughly and dry them completely.
- Push back your cuticles gently with a cuticle pusher. Do not cut unless necessary.
- File all nails to the same shape and length. Uneven lengths ruin the symmetry of a French tip.
- Lightly buff the surface of each nail. Use gentle strokes, not heavy pressure. Over-buffing weakens the nail plate.
- Wipe every nail with acetone or a dehydrating nail prep solution to remove all oils and dust. This step is critical. Oil left on the nail is the number one reason guides lift and polish bleeds underneath.
- If you are using gel polish, apply a PH Bond or Bonder and let it dry. Then apply a thin layer of primer.
One detail most articles skip: after buffing, hold your nail up to a light source. You should see no shiny patches. A shiny spot means oil is still present. Wipe that area again before continuing.
Step 2: Apply Your Base Color
The base color is the nude, sheer pink, or natural tone that covers the full nail before you add the white tip.
For Regular Nail Polish
- Apply a thin coat of base color across the entire nail.
- Let it dry completely. This usually takes 10 to 20 minutes. Do not rush it.
- Apply a second thin coat if coverage is uneven. Let it dry again fully before touching the guide stickers.
A common mistake is pressing the guide onto polish that feels dry on top but is still soft underneath. The sticker will then sink into the polish and lift it when you remove it. If you press your nail and leave a faint indent, the polish is not ready yet.
For Gel Polish
- Apply a thin base coat and cure for 60 seconds under your UV/LED lamp.
- Apply your first coat of base color and cure for 60 seconds.
- Apply a second coat and cure for 60 seconds.
- Wipe away the inhibition layer (the sticky top film) with a lint-free pad and gel cleanser before applying the guide. If you skip this step, the guide will not adhere properly and polish will bleed underneath.
Step 3: Place the French Nail Tip Guide
This is the step where most people get uneven results. Take your time here.
- Use tweezers to pick up the guide sticker. Avoid touching the adhesive side with your fingers, as natural oils reduce the stick.
- Before placing it on your nail, press the sticker lightly against the back of your other hand two or three times. This removes a small amount of adhesive so the guide grips firmly but lifts cleanly without pulling up your base color.
- Position the center of the guide at the midpoint of your nail, at the height where you want your smile line to begin. Most people place the line slightly above the free edge. The higher you place it, the thinner the tip will look.
- Press the guide firmly across the entire nail, especially along the curved edge and both sides where the guide meets the nail walls. Run your fingernail or a cuticle stick along the edge to seal it.
- Check from different angles that the curve sits evenly on both sides. If it looks off, lift and reposition immediately. Once the paint goes on, you are committed.
A tip that competitors miss: work on one nail at a time. Do not place guides on all ten nails and then paint. The adhesive can shift or lift slightly while you are working on other nails.
Step 4: Apply Your Tip Color
For Regular Nail Polish
- Apply a thin coat of white or off-white polish over the exposed nail tip, above the guide.
- Use a single smooth stroke if possible. Avoid going back and forth repeatedly, as this creates streaks.
- Do not let it dry completely before peeling the guide. Remove the guide while the polish is still slightly wet. If the polish dries first, it will crack or peel away from the nail when you pull the sticker.
For Gel Polish
- Apply a thin coat of tip color above the guide.
- Do a flash cure of 5 to 10 seconds only. Do not fully cure.
- Peel the guide off immediately after the flash cure, before the gel is set.
- Now fully cure the tip color for 60 seconds.
The flash cure step is something almost no competitor article explains clearly. If you fully cure before removing the guide, the gel hardens around the sticker edge and creates a rough, uneven line when you pull it off.
For Polygel or Acrylic
Standard adhesive guides do not work reliably with thick materials like polygel or acrylic. Use a stainless steel French guide plate instead. Hold the metal edge against your nail as a stencil and use a brush to apply the product against the edge. The metal is rigid enough to give you a clean slice through uncured material.
Step 5: Peel the Guide and Clean Up the Line
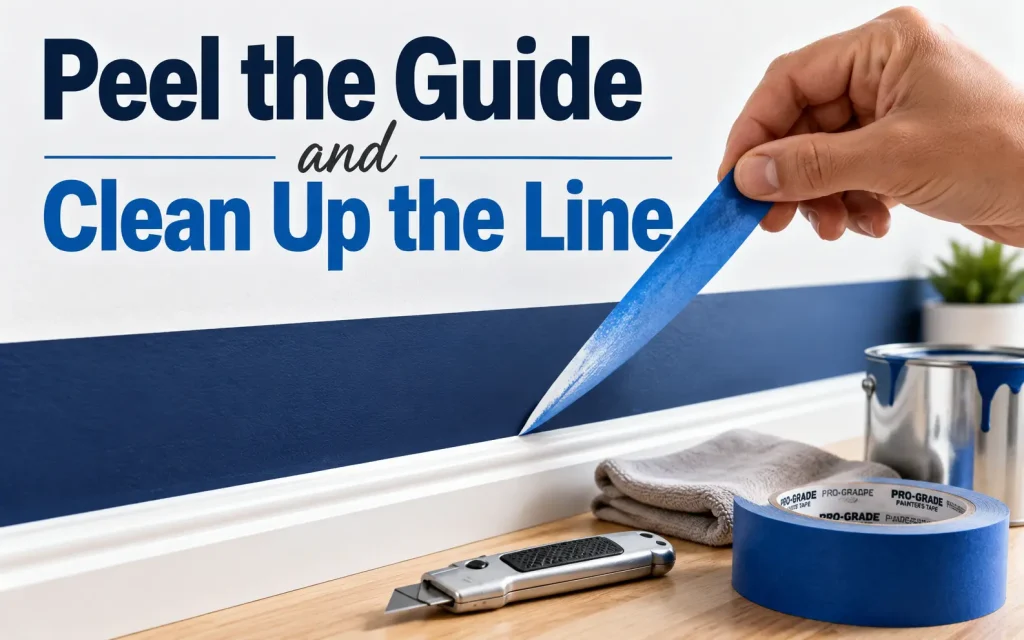
- Hold the nail still and peel the guide back slowly from one corner, pulling it back at a low angle parallel to the nail rather than pulling it straight up.
- If any tip color bled under the guide edge, use a thin angled brush dipped in acetone (for regular polish) or gel cleanser (for gel) to gently carve out a clean curve. Work from the center of the smile line outward to each side.
- If the smile line looks slightly uneven, use the cleanup brush to even it out before it sets.
This cleanup step is what separates a professional-looking result from a homemade-looking one. Even salon technicians clean up their lines. Plan for it and do not skip it.
Step 6: Seal with Top Coat
- Apply a thin, even layer of top coat across the entire nail.
- When you reach the tip of the nail, drag the top coat slightly over the free edge to cap it. This seals the smile line and prevents chipping.
- If you are using gel, cure the top coat for 60 seconds. Wipe off the inhibition layer with cleanser if you want a non-sticky finish.
- Apply cuticle oil around the nail and massage it in. This keeps the skin around your nails hydrated and makes the whole manicure look cleaner and more finished.
Capping the free edge is a step that most home tutorials do not mention. It is the main reason salon manicures last longer. The tip of the nail takes the most physical stress during the day. Sealing it adds days to your wear time.
Common Problems and How to Fix Them
| Problem | Likely Cause | Fix |
| Polish bleeds under the guide | Guide not pressed down firmly enough, or base color was not fully dry | Press harder along the curved edge. Let base color dry or cure completely before placing the guide. |
| Guide lifts the base color when removed | Guide adhesive was too strong, or base color was still soft | Pre-stick the guide on your hand first to reduce adhesive. Make sure base color is fully dry before placing. |
| Wavy or uneven smile line | Guide was placed off-center, or polish was applied unevenly | Use an angled cleanup brush with acetone to re-carve the curve after removal. |
| Gel cracks at the smile line after curing | Guide left on during full cure | Flash cure 5-10 seconds only, remove guide, then fully cure. |
| Tip chips within one or two days | Free edge was not sealed | Always cap the free edge with top coat. Repeat the top coat every two to three days. |
| Tips look too thick or heavy | Too much polish applied above the guide | Apply one thin coat only. Build color with multiple thin layers if needed. |
Guide Shapes for Different Nail Tip Styles
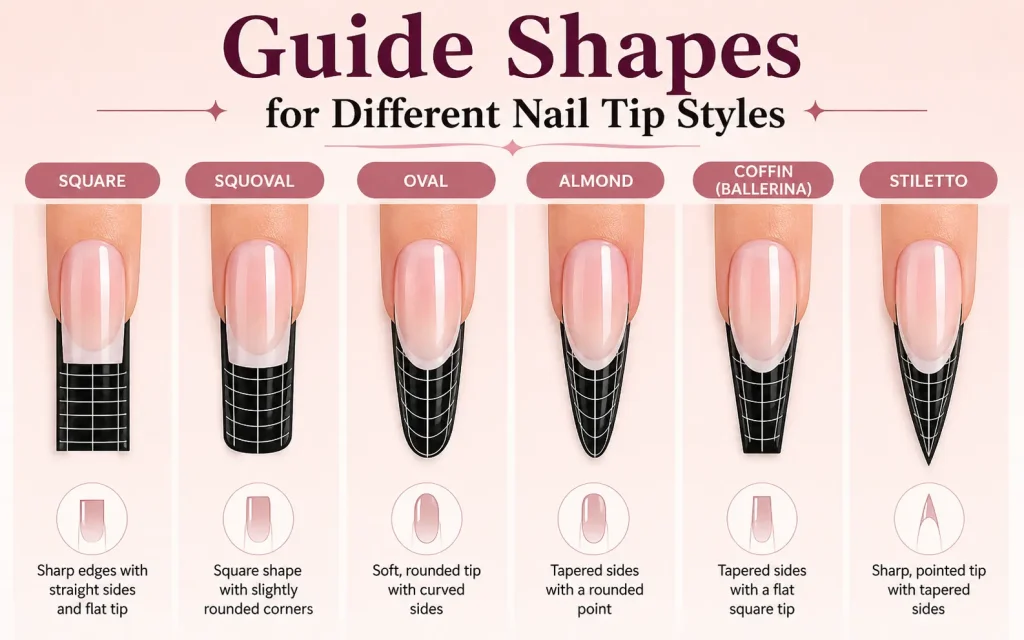
French nail tip guides are not only for the classic white curve. Here is how to use different guide shapes to create modern variations.
- Classic French: Use a round C-curve guide and white or off-white tip color. This is the standard look.
- Colored French tips: Use the same round guide but swap white for sage green, soft lavender, baby blue, or any pastel. The process is identical.
- Chrome or metallic tips: Apply the guide, then rub chrome powder over the exposed tip with a sponge applicator before removing the guide. Seal with a no-wipe top coat.
- Micro French: Place the guide very close to the free edge so only a sliver of tip is exposed. This gives an ultra-thin, minimalist look that works on short nails.
- V-tip or chevron: Use a V-shaped guide or cut a standard guide into a point. Paint the tip in any color for a graphic, modern result.
- Double French: Apply one guide at the tip and a second thinner guide at the cuticle. Paint both exposed areas the same color for a framed-nail effect.
How Long Do French Tips with Guides Last
With regular nail polish and a quality top coat, French tips typically last five to seven days before noticeable tip wear begins. With gel polish and proper prep and sealing, you can expect ten to fourteen days of wear.
The most important factor for longevity is nail prep. Oily nails cause early lifting regardless of the products you use. The second most important factor is sealing the free edge. Nails that are not capped at the tip chip faster because the edge is exposed to constant friction.
Reapply a thin layer of top coat every two to three days to extend the life of your manicure without redoing it entirely.
Frequently Asked Questions
Can I reuse french nail tip guides?
Most standard guide stickers are single-use. Once removed, the adhesive is usually not strong enough to create a clean seal on a second nail. Some packs come with extras specifically so you have spares if one does not sit right.
Do french tip guides work on short nails?
Yes, but you need to use a micro French guide or place a standard guide very close to the free edge. If the guide covers too much of a short nail, you will end up with almost no base color visible. Use tweezers to position the guide precisely on smaller nails.
Why does my smile line look jagged after peeling the guide?
This usually means the guide shifted slightly during application, the polish was applied too thickly at the edge, or you peeled the guide at the wrong angle. Pull the guide back parallel to the nail surface rather than lifting it straight up. Clean any jagged areas with an angled brush and acetone before sealing with top coat.
Can I use french nail tip guides with dip powder?
Guides work with dip powder, but the technique is slightly different. Apply the guide after your base coats, then dip the tip into the white powder. Tap off the excess and remove the guide before applying the activator. Activator sets the powder quickly, so timing matters here.
What is the difference between french nail tip guides and nail tape?
Guides are pre-shaped stickers designed specifically for the curved French tip smile line. Nail tape is a thin straight tape that you cut and position yourself, which gives more flexibility for custom shapes like chevrons or geometric tips but requires more skill to align evenly. Guides are more beginner-friendly because the curve is built in
Final Thought
French tip guides make it much easier to achieve clean and even smile lines, but the best results come from using the right technique. Always work in good lighting so you can check that each guide is positioned evenly, and practice on one or two nails before completing your full manicure.
Apply two thin coats of tip color instead of one thick coat for a smoother finish and faster drying time. Store your guide stickers in a cool, dry place to preserve their adhesive quality, and if you are using gel polish, keep a lint-free wipe and gel cleanser nearby for quick cleanup. Instead of shaking your nail polish bottle, roll it gently between your palms to prevent air bubbles from forming.
Finish every manicure by applying cuticle oil to hydrate the surrounding skin and give your nails a polished, salon-quality appearance. With proper preparation, careful guide placement, and a cleanup brush on hand, French tip guides help you create professional-looking manicures at home with consistent, crisp results.
You May Also Like It:
The Tech Yourself How to Guides Mist Gamer Purchase
How to Use French Tip Guides With Gel Polish