
How to Use French Tip Guides With Gel Polish are one of the best-kept secrets of a clean at-home French manicure. If you have ever tried to paint a perfect smile line freehand and ended up with wobbly, uneven tips, you already know why these little stickers exist. When you pair them with gel polish, the results are genuinely salon-quality, and the whole process becomes far less stressful.
This guide covers everything your competitors skip how to pick the right guide shape for your nail, why timing matters when you peel, how to avoid polish bleeding, and what to do when things go wrong. Whether you are a complete beginner or just looking for a cleaner technique, you will find what you need here.
What Are French Tip Guides and Why Use Them With Gel Polish
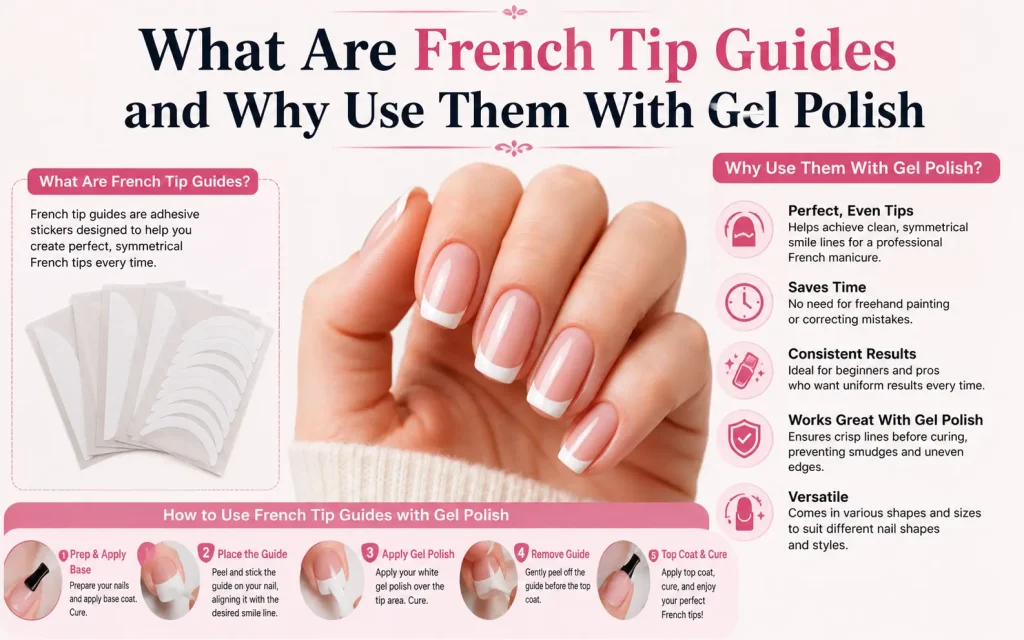
French tip guides (also called French manicure stickers or tip stencils) are thin adhesive strips with a curved or straight edge. You press them onto the nail to mask the base area, paint over the exposed tip, then peel them away to reveal a crisp smile line underneath.
Gel polish makes this process much easier than regular nail polish for one important reason: gel stays wet until you cure it under an LED or UV lamp. That means you have all the time you need to place the guide, paint carefully, fix any smudges, and still get a perfect result. With regular polish, the clock is ticking from the moment you open the bottle.
Additional advantages of using gel polish with tip guides:
- Thicker consistency means less bleeding under the guide
- Higher pigmentation means full coverage in one to two coats
- Lasts up to three weeks without chipping when applied correctly
- No-wipe top coats create a smooth, glassy finish over the smile line
What You Need Before You Start
Having everything on hand before you begin makes the process smooth and stress-free.
| Item | Purpose |
|---|---|
| Nail file (180/220 grit) | Shape the nail |
| Buffer block | Smooth the nail surface |
| Cuticle pusher | Push back cuticles |
| Nail cleanser or 90%+ isopropyl alcohol | Remove oil and dust |
| pH bond or dehydrator | Improve adhesion |
| Gel base coat | Anchor the polish |
| Sheer nude or pink gel polish | Base color |
| White gel polish (opaque) | French tip color |
| French tip guides / stencil stickers | Create the smile line |
| UV or LED nail lamp | Cure each layer |
| Gel top coat (no-wipe recommended) | Seal and add shine |
| Cleanup brush | Fine corrections with acetone |
| Acetone | Clean up edges |
Optional but helpful:
- A nail palette or foil for decanting polish
- Liquid latex or peel-off tape around the cuticles
- A silicone nail stamper (alternative method, covered below)
Nail Prep: The Step Your Results Depend On
Most people rush prep, and it is the single biggest reason French tips chip, lift, or look uneven. Take your time here.
Step 1: Shape Your Nails
File your nails to your preferred shape using a 180 or 220 grit file. Move in one direction rather than sawing back and forth, which can cause splitting. For French tips, oval, almond, squoval, and square shapes all work well. Oval and almond shapes are currently the most popular because the curved tip naturally echoes the curved smile line of the French.
For short nails, keep the tip proportion in mind. The white tip should never exceed one-fifth to one-quarter of the total nail length. A thinner tip on short nails visually elongates the finger rather than cutting it off.
Step 2: Buff the Surface
Use a buffer block to gently remove the natural shine from the nail plate. This roughens the surface slightly so the base coat bonds properly. Do not over-buff, especially on thin nails. A few light passes are all you need.
Step 3: Push Back Cuticles
Use a cuticle pusher to gently push the cuticles back. Do not cut live skin. This gives you a clean canvas and prevents product from touching the skin, which causes lifting.
Step 4: Cleanse
Wipe every nail with a lint-free pad soaked in nail cleanser or high-percentage isopropyl alcohol. This removes oils, dust from buffing, and any residue. This step is non-negotiable. Even clean-looking nails carry natural oils that will prevent the gel from bonding.
Step 5: Apply pH Bond or Dehydrator
Apply a thin layer of pH bond or dehydrator to each nail and let it air dry for 30 seconds. This further removes moisture and creates an ideal surface for the base coat to grip.
How to Apply the Base Coat and Base Color
Base Coat
Apply a thin, even layer of gel base coat to each nail. Start by placing the brush at the center of the nail near the cuticle, pressing it gently down, then sweeping it toward the tip. Pull the product along each side wall and cap the free edge (run the brush along the very tip of the nail) to prevent future chipping.
Keep the base coat close to the cuticle and side walls without touching the skin. If you get any on the skin, remove it immediately with a micro brush dipped in cleanser before curing. Cure for 60 seconds under an LED lamp. The base coat will leave a sticky layer after curing. This is the inhibition layer, and it is completely normal. Do not wipe or touch it.
Base Color (Nude or Pink)
Roll the gel polish bottle between your palms before opening it. This distributes the pigment evenly. Do not shake the bottle, as shaking creates air bubbles that can show up on the nail surface.
Apply a thin coat of your sheer nude or pink gel polish over the base coat. Use the same technique: center, then sides, then cap the free edge. Cure for 60 seconds. Apply a second coat for fuller coverage if needed and cure again. Your base should be smooth and even with no visible streaks or thin patches.
How to Use French Tip Guides With Gel Polish: The Main Method
This is the step most tutorials get wrong or rush through. The details here are what separate a clean result from a messy one.
Step 1: Choose the Right Guide Shape
French tip guides come in several curve shapes: shallow curve, medium curve, and deep curve.
Choose based on the shape and width of your nail:
- Shallow curve: suits wide, flat nails or a modern, straighter French look
- Medium curve: the most universal shape and a good starting point for most nails
- Deep curve: suits narrow nails or those who prefer the classic, dramatic smile line
If your guides come in different sizes, choose the one that fits your nail width without overlapping the sidewalls. A guide that is too narrow lets polish bleed under the edges.
Step 2: Remove the Inhibition Layer Before Applying Guides
This is a step almost no competitor article explains. The gel inhibition layer left after curing your base color is sticky. If you press a French tip guide onto a sticky surface, it will not adhere properly and polish will bleed underneath.
Wipe your cured base color with a nail cleanser wipe or an isopropyl alcohol pad before applying the guides. This removes the sticky inhibition layer and gives the guide a dry surface to stick to. Do not skip this step.
Step 3: De-tack the Guide (Pro Trick)
Before placing the guide on your nail, press it gently against the back of your hand two or three times. This removes a small amount of the guide’s adhesive, which makes it less aggressive on your nail. A slightly less sticky guide is much easier to peel off cleanly without dragging the base color with it.
Step 4: Apply the Guide
Peel the guide from its backing and place it on your nail, curved edge pointing toward the center of the nail (not the tip). The area between the guide and the free edge of your nail is where you will paint the white tip.
Press the guide down firmly, especially along the curved smile line edge. Use an orange stick or your fingernail to press along the entire edge, making sure there are no lifted sections. Any gap between the guide and the nail is a gap where polish will bleed under.
Position the guide consistently across all nails. The depth of the smile line should be proportional to your nail length: roughly one-fifth of the nail length for short nails, up to one-quarter for longer nails.
Step 5: Apply White Gel Polish to the Tip
Decant a small amount of white gel polish onto a nail palette or a piece of foil. Working from a palette rather than directly from the bottle gives you much more control over how much product is on the brush.
Apply the white gel polish in thin, even strokes over the exposed tip, working from one side wall across to the other. Stay just within the guide edge. Do not load the brush with too much product, as excess will pool and potentially seep under the guide edge.
Cap the free edge of the nail with the white polish by running the brush along the very tip. This is important for durability, as the tip of the nail is where chipping typically starts first.
Apply one coat, then flash-cure for 10 seconds. Check the coverage. If the white looks thin or patchy, apply a second coat and flash-cure again. Finish with a full 60-second cure.
Step 6: Peel the Guide Off
Peel the guide immediately after curing while the gel is warm. Lift one corner gently and pull it back slowly and at a low angle, almost parallel to the nail surface. Pulling upward at a sharp angle is more likely to drag the base color with it.
If you wait too long after curing, the guide can bond more firmly to the gel surface and become harder to remove cleanly.
Step 7: Clean Up
Even with a well-placed guide, there may be tiny imperfections along the smile line. Dip a fine cleanup brush in acetone and gently trace along the edge of the white tip to sharpen the line. Use the smallest amount of acetone possible to avoid flooding the surrounding gel.
If some white polish has bled under the guide, wipe it with a cotton swab dipped in rubbing alcohol before curing. Because it was under the guide and not exposed to the lamp, it was never cured and will come off easily with alcohol. For a stubborn spot after curing, use a cleanup brush with acetone.
Apply the Top Coat and Final Cure
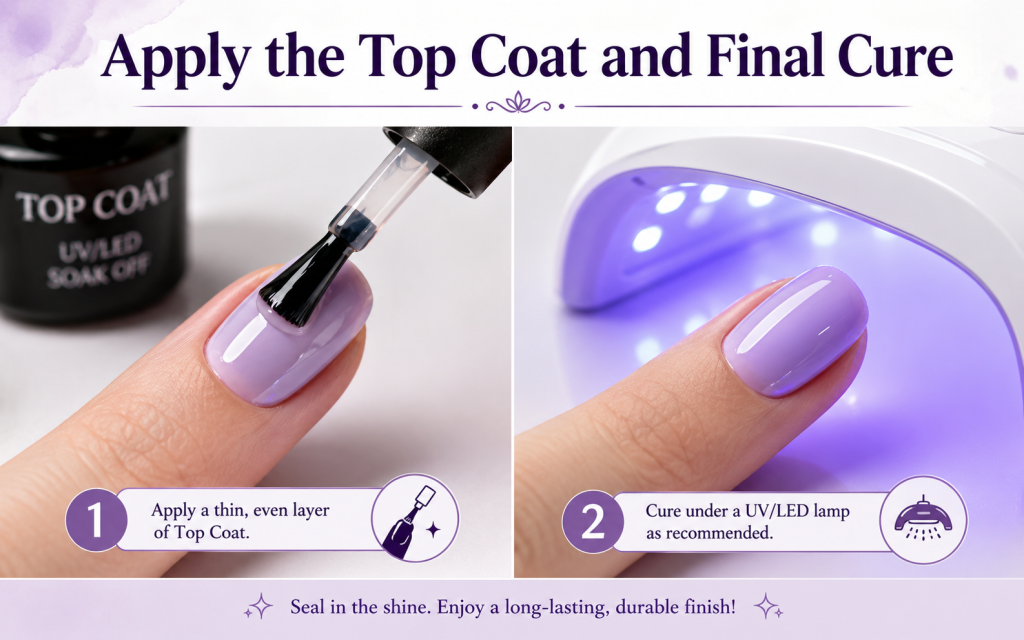
Apply a thin, even layer of gel top coat over the entire nail, including over the smile line and capping the free edge. A no-wipe top coat is recommended because it gives a perfectly smooth, glossy finish without the need for a final wipe-down that can smear the design.
Cure for 60 seconds (or 120 seconds for a long-press as directed on some products). Once cured, your French tip gel manicure is complete and fully set.
Alternative Methods: When Guides Are Not the Only Option
French tip guides work beautifully, but they are not the only method. Here is a quick comparison so you can choose the right tool for your skill level and goals.
| Method | Best For | Skill Level | Result |
|---|---|---|---|
| French tip guides (stickers) | Beginners, consistent smile lines | Beginner | Clean, uniform curves |
| Silicone nail stamper | Speed, soft press-on tips | Beginner to intermediate | Soft, rounded tips |
| Ultra-fine nail brush (freehand) | Full control, custom shapes | Intermediate to advanced | Fully customizable |
| Stainless steel guide plate | Polygel, acrylic, thick product | Intermediate | Razor-sharp lines |
The silicone stamper method is worth understanding as a complement to tip guides. Apply a thin layer of white gel polish to the silicone head, press your nail tip into the polish at a 45-degree angle (not straight down), tilt slightly to each side to form the curve, then cure. The silicone molds naturally to the curve of your nail.
Common Mistakes and How to Fix Them
Polish Bleeds Under the Guide
Cause: The inhibition layer was not removed before applying the guide, the guide edge was not pressed down firmly, or too much polish was loaded onto the brush.
Fix: Always wipe with alcohol before applying the guide. Press the guide edge down with an orange stick. Use thin coats of polish and work close to the guide edge without flooding it.
Guide Pulls Off the Base Color When Removed
Cause: The guide was too sticky, or you pulled it at a sharp upward angle.
Fix: De-tack the guide on the back of your hand before applying it. Peel slowly at a low, flat angle immediately after curing.
Uneven Smile Line Across Different Nails
Cause: The guide was placed at different depths on each nail.
Fix: Use a reference point. The side wall of the nail, where the smile line traditionally dips to its lowest point, should be consistent across all nails. Place the guide at the same proportional distance from the cuticle on each nail.
White Tips Look Yellowed or Sheer
Cause: Low-quality white gel polish, or not enough coats.
Fix: Use a highly opaque, bright white gel polish. Apply two thin coats rather than one thick coat, curing between each.
Tips Chip at the Edge
Cause: The free edge was not capped with both the white polish and the top coat.
Fix: Always run the brush along the very tip of the nail when applying white polish and again when applying top coat. This seals all the layers together and dramatically improves durability.
Air Bubbles in the Polish
Cause: The bottle was shaken rather than rolled.
Fix: Always roll the bottle between your palms to mix. Never shake a gel polish bottle.
Modern French Tip Variations You Can Try With Guides
French tip guides are not just for classic white tips once you are comfortable with the basic technique, use the same method to create:
- Colored French tips: swap white for any gel color. Pastels, neons, and deep jewel tones are all popular alternatives.
- Negative space French: use a clear top coat over the guide instead of a color to leave the natural nail showing through as the tip.
- Glitter French tips: apply a glitter gel over the white tip before the top coat for a festive look.
- Ombre French tips: blend two colors within the tip zone using a sponge before curing for a gradient effect.
- Reverse French: place the guide near the base of the nail (the moon area) rather than the tip and apply your color there instead.
- Micro-French: position the guide very close to the free edge to create an ultra-thin white tip, ideal for short nails.
How to Make Your French Tip Gel Manicure Last Longer
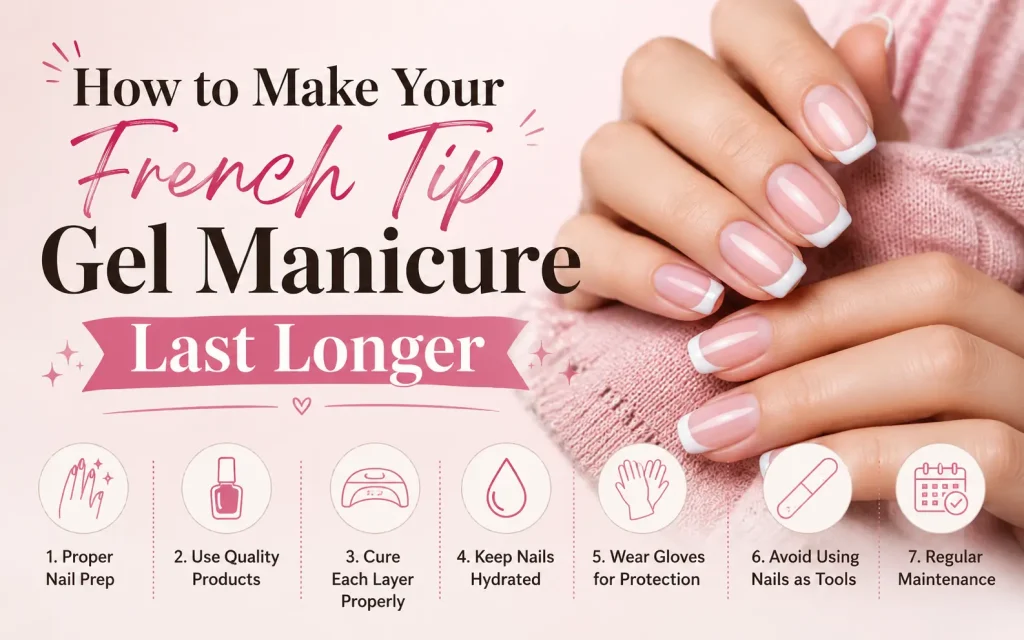
A well-done gel French tip should last two to three weeks without chipping.
These habits make the difference:
- Always cap the free edge at every layer: base coat, base color, white tip, and top coat
- Apply a thin reapplication of top coat every five to seven days and cure again
- Wear gloves when washing dishes or cleaning with harsh products
- Apply cuticle oil daily to keep the skin around the nail hydrated. Dry, cracked skin pulls at the edges of the gel and speeds up lifting
- Avoid using your nails as tools to open cans, peel stickers, or scrape surfaces
- If a small chip appears at the edge, do not pick at it. Touch it up with a dot of top coat and re-cure immediately
How to Remove Gel French Tips Safely
When you are ready for a change, remove the gel properly rather than peeling or picking, which damages the nail plate.
- File the surface of the top coat lightly with a 180 grit file to break the seal
- Soak a small cotton pad in pure acetone and place it directly on the nail
- Wrap the fingertip in foil to hold the pad in place
- Wait 10 to 15 minutes, then slide the foil and pad off. The gel should come off with it
- Use a wooden cuticle pusher to gently remove any remaining residue
- Wipe with alcohol and apply cuticle oil generously to restore moisture
- Wait at least 24 hours before applying a new set if the nails feel thin or sensitive
Competitor Comparison: What This Guide Covers That Others Miss
| Topic | This Guide | Nailster | The Gel Bottle | Mylee |
|---|---|---|---|---|
| Removing inhibition layer before guides | Yes | No | No | No |
| De-tacking the guide before application | Yes | No | No | No |
| Guide shape selection by nail type | Yes | No | No | No |
| Flash-cure technique between coats | Yes | Partial | No | No |
| Angle and method for peeling guides | Yes | No | No | No |
| Fixing bled polish without acetone | Yes | No | No | No |
| Nail-length proportion for tip width | Yes | No | No | Partial |
| Bottle rolling vs. shaking explained | Yes | Yes | No | No |
| Alternative methods comparison table | Yes | No | Partial | Partial |
| Aftercare and longevity tips | Yes | No | No | Partial |
| Safe removal steps | Yes | No | No | Partial |
| Modern variations with guides | Yes | No | No | Yes |
FAQs
Can you use French tip guides with gel polish?
Yes. French tip guides work very well with gel polish and help create clean, even smile lines. For best results, remove the sticky layer from the base color before applying the guides.
Do I remove the French tip guides before curing the white gel polish?
Most nail technicians recommend removing the guides while the white gel polish is still wet and then curing it. This helps prevent the polish from lifting or creating jagged lines.
Why does gel polish bleed under French tip guides?
Bleeding usually happens when the guide is not pressed firmly against the nail or when too much polish is applied. Using thin coats and sealing the edges of the guide with gentle pressure can help prevent this problem.
Can I reuse French tip guides?
Most French tip stickers are designed for one-time use. Reusing them may reduce their adhesive strength and result in uneven lines.
How long should I cure gel polish for a French manicure?
Curing times depend on the brand and lamp you use. LED lamps typically require 30 to 60 seconds per layer, while UV lamps may require around 2 minutes. Always follow the instructions provided by the gel polish manufacturer.
Final Thoughts
French tip guides take most of the guesswork out of the hardest part of a French manicure the smile line When you pair them with gel polish, you get a result that is crisp, durable, and genuinely comparable to what a nail technician produces in a salon.
The key is in the details that most tutorials overlook wiping the inhibition layer, de-tacking the guide, capping the free edge at every layer, and peeling at the right angle.
Take your time on prep, stay patient with thin coats, and do not skip the top coat step with a little practice, the whole process becomes second nature, and you will have a French manicure that lasts a full two to three weeks without a single chip.
You May Also Like It:
How to Meet Your Spirit Guides
How to Add Guides in Photoshop
How to Hide Guides in Photoshop