
How to add guides in illustrator if you have ever struggled to align objects perfectly in Adobe Illustrator guides are your best friend. Whether you are designing a logo a social media graphic or a full layout guides help you place every element exactly where it needs to be.
This guide covers every method to add guides in Illustrator from the basic drag technique to advanced custom guides that most tutorials skip entirely.
What Are Guides in Illustrator
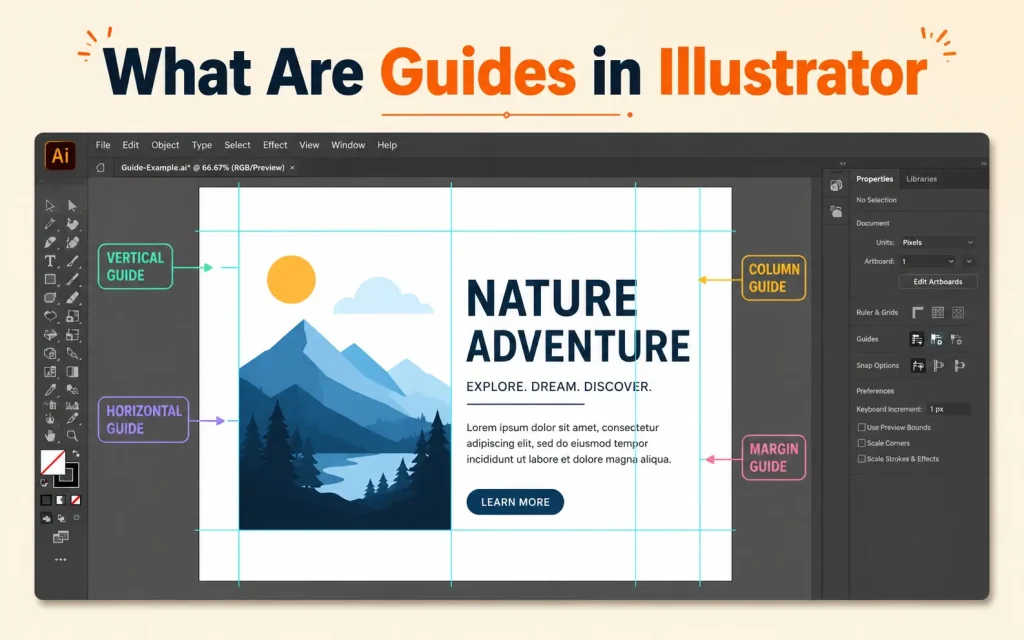
Guides are non-printing lines that float over your canvas. They appear in a light blue or cyan color by default and they never show up in your final exported artwork. Think of them as invisible rulers that help you snap and align objects with precision.
Guides work hand in hand with rulers and smart guides to give you complete control over your design layout.
Step 1 Turn On Rulers First
Before you can drag out a guide you need to make your rulers visible.
- Press Ctrl+R on Windows or Command+R on Mac to toggle rulers on
- Rulers appear at the top and left edges of your canvas
- Right-click on any ruler to change the unit of measurement such as pixels inches or millimeters
- This unit change applies to the current view but does not permanently override your document settings
Pro Tip: Go to Preferences and open User Interface to brighten Illustrators interface. This makes the ruler tick marks much easier to see especially on darker themes.
Step 2 Drag a Guide from the Ruler
This is the most common method and the fastest way to get a guide onto your artboard.
- Click anywhere on the top horizontal ruler and drag downward to create a horizontal guide
- Click anywhere on the left vertical ruler and drag to the right to create a vertical guide
- Release the mouse to place the guide exactly where you want it
- Press Escape while dragging to cancel the guide before placing it
That is all it takes to add a basic guide in Illustrator. Now lets look at the more powerful methods your competitors did not explain.
Step 3 Add a Guide Without Dragging
You do not always have to drag. There are two faster ways:
- Double-click directly on the ruler to instantly drop a guide at that position
- Hold Shift while dragging to snap the guide to the nearest tick mark on the ruler for more precise placement
Step 4 Create an Angled or Diagonal Guide
This is a feature most beginner tutorials completely ignore. Standard guides are only horizontal or vertical but Illustrator lets you create guides at any angle.
Here is how to do it:
- Select the Line Segment tool from the toolbar
- Draw a line at any angle you want
- Use the Transform panel to set a precise angle such as 45 degrees
- Go to View in the top menu
- Click on Guides and then select Make Guides
That line is now a guide. You can use this technique to create grid layouts at any rotation which is especially useful for isometric designs and diagonal compositions.
To convert a guide back to a regular editable line go to View then Guides and select Release Guides.
Step 5 Create a Guide at an Exact Position
Dragging guides by hand is quick but not always precise enough. When you need a guide at a specific pixel or millimeter position use this method:
- Double-click on an existing guide to open the Guide dialog box
- Enter the exact X or Y value where you want the guide positioned
- Click OK and the guide snaps to that exact coordinate
Alternatively you can click on a guide to select it and then use the Transform panel to type in the exact X and Y coordinates. This is the most precise way to position guides in Illustrator.
Step 6 Change a Guide from Horizontal to Vertical
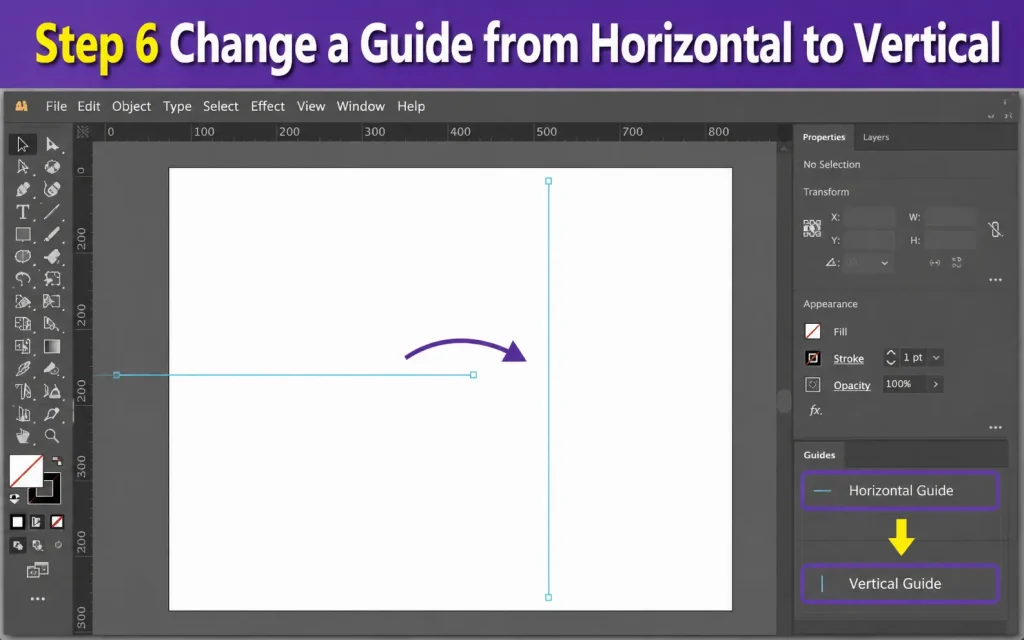
If you dragged the wrong type of guide you do not need to delete it and start over.
- Hold Alt on Windows or Option on Mac while dragging a new guide out from the ruler
- This instantly switches the guide orientation from horizontal to vertical or vice versa
This shortcut only works while you are dragging a new guide. For an existing guide you will need to delete it and place a new one.
Step 7 Create Two Perpendicular Guides at Once
This is a hidden gem that most designers do not know about:
- Hold Ctrl on Windows or Command on Mac and drag from the very corner where the two rulers meet in the upper left of your workspace
- This drops both a horizontal and a vertical guide at the same time at your cursor position
This saves you extra steps when building grid-based layouts.
Step 8 Use the Edit Guides Dialog for Precise Control
For professional-level precision go to Edit in the top menu and select Guides. This opens a dialog where you can:
- Set the exact position of a new guide using numeric input
- Choose whether the guide is horizontal or vertical
- Confirm the unit of measurement being used
Step 9 Set Up Smart Guides for Snapping
Smart Guides are a powerful companion feature that makes guides even more useful. When Smart Guides are on Illustrator shows you alignment hints and snapping indicators as you move objects near your guides.
- Press Ctrl+U on Windows or Command+U on Mac to toggle Smart Guides on or off
- When enabled you will see pop-up labels showing distances angles and alignment as you drag objects
- Smart Guides work especially well when you want to align a guide to the edge of an artboard or a specific object
Smart Guides do not replace regular guides but they make placing and working with guides much faster.
Step 10 Organize Guides on Their Own Layer
This is a professional workflow tip that most basic tutorials never mention. If you work on complex projects with many guides things can get messy very quickly. The solution is to put your guides on a dedicated layer.
Here is how to do it:
- Open the Layers panel
- Create a new layer at the top of your layer stack and name it Guides
- Make sure this layer is selected when you drag out guides
- When you need to clear the canvas or hide guides temporarily you can lock or hide this entire layer with one click
This approach keeps your guides completely separate from your artwork and gives you full control without accidentally selecting or moving them when editing other elements.
Step 11 Lock and Unlock Guides
Guides can be selected and accidentally moved if you are not careful. To prevent this:
- Go to View then Guides and click Lock Guides
- This prevents any guide from being selected or dragged out of position
- To move a guide again go back and deselect Lock Guides
You can also lock guides from the View menu using the keyboard shortcut Alt+Ctrl+Semicolon on Windows or Option+Command+Semicolon on Mac.
Step 12 Show and Hide Guides Without Deleting Them
When you want to see your artwork without the guide lines cluttering the view you do not need to delete them. Just hide them temporarily.
- Press Ctrl+Semicolon on Windows or Command+Semicolon on Mac to toggle guides on and off
- Your guides stay exactly where they are and reappear when you press the shortcut again
This is incredibly useful when you want to preview how the final design looks before exporting.
Step 13 Copy a Guide to Create Equally Spaced Guides
This is another workflow trick that most tutorials leave out entirely. When you need multiple guides at regular intervals you do not need to drag each one separately.
Here is how to duplicate a guide at precise intervals:
- Click on an existing guide to select it
- Hold Alt on Windows or Option on Mac
- Press any arrow key to copy the guide and move it by the keyboard increment distance
- Keep pressing Alt plus the arrow key to add more guides at the same equal spacing
- To change the keyboard increment distance go to Preferences then General and adjust the keyboard increment value
Step 14 Delete Guides
To remove a single guide click on it to select it and press the Delete key.
To clear all guides at once go to Edit then select Clear Guides. This removes every guide from your document in one action.
Step 15 Change Guide Color
By default guides appear in a cyan blue color. If your artwork uses similar colors this can make guides hard to see. You can change the guide color in preferences:
- Go to Edit then Preferences then Guides and Grid on Windows
- On Mac go to Illustrator then Preferences then Guides and Grid
- Click the color swatch next to Guides and choose any color you prefer
- Click OK and your guides will immediately update to the new color
Complete Keyboard Shortcuts Reference

Here is every shortcut you need for working with guides and rulers in Illustrator:
Show or hide rulers: Ctrl+R on Windows and Command+R on Mac
Show or hide guides: Ctrl+Semicolon on Windows and Command+Semicolon on Mac
Lock or unlock guides: Alt+Ctrl+Semicolon on Windows and Option+Command+Semicolon on Mac
Toggle Smart Guides: Ctrl+U on Windows and Command+U on Mac
Double-click ruler: Creates a guide without dragging
Hold Shift while dragging: Snaps guide to nearest ruler tick mark
Hold Alt or Option while dragging: Switches guide from horizontal to vertical
Hold Ctrl or Command and drag from ruler corner: Creates two perpendicular guides at once
Escape while dragging: Cancels guide placement before releasing
Common Mistakes to Avoid
Forgetting to turn on rulers before trying to drag a guide is the most common beginner mistake. The ruler panel must be visible for dragging to work.
Accidentally moving guides while editing artwork is another frequent issue. Always lock your guides when you are done placing them.
Using guides instead of artboard margins for print work can cause problems. For print layouts use the document bleed and margin settings rather than relying only on manual guides.
Guides vs Smart Guides vs Grids
Understanding when to use each alignment tool saves a lot of time:
Guides are manually placed lines that stay fixed until you move or delete them. Use them when you need specific alignment markers that persist throughout your design process.
Smart Guides appear automatically as you drag objects and show temporary snapping hints. Use them when you want dynamic alignment feedback without permanent guide lines.
Grids are a repeating pattern of lines across your entire canvas. Use them when you need consistent spacing across the whole document. Enable grids by going to View then Show Grid.
For most design work a combination of all three gives you the best results.
FAQs
Why is “Make Guides” greyed out in Illustrator?
“Make Guides” is usually greyed out because no object is selected, the object is locked, or you are trying to create guides from an unsupported element.
How do I enable Make Guides in Adobe Illustrator?
Select a vector object or path, then go to View > Guides > Make Guides. The option should become available when a valid object is selected.
Can I create guides from text in Illustrator?
Yes, but you may need to convert the text to outlines first using Type > Create Outlines before making guides.
Why can’t I make guides on a locked layer?
Illustrator prevents guide creation on locked layers. Unlock the layer from the Layers panel and try again.
Does Make Guides work with raster images?
No, Make Guides only works with vector objects and paths, not with placed raster images such as JPG or PNG files.
How do I unlock guides in Illustrator?
Go to View > Guides > Lock Guides and uncheck it if guides are locked and cannot be edited.
Can hidden guides cause the Make Guides option to appear unavailable?
Hidden guides typically do not disable the command, but showing guides again through View > Guides > Show Guides can help with guide management.
Final Thoughts
Mastering guides in Adobe Illustrator is one of the simplest ways to make your designs more precise and your workflow faster. From dragging out a quick horizontal guide to building a full multi-layer guide system the tools are all built right into Illustrator.
Start with the ruler drag method then explore smart guides and custom angled guides as your projects get more complex. Once you build the habit of using guides consistently you will wonder how you ever designed without them.