Drawing a river may look difficult at first, but it becomes much easier when you break it into simple shapes. A river is not just a long strip of water. It has movement, depth, curves, reflections, banks, rocks, plants, shadows, and light. When you understand these parts, your river drawing starts to look more natural and realistic.
In this guide you will learn how to draw a river step by step, even if you are a beginner. You will also learn how to make the water look like it is flowing, how to add riverbanks, how to draw rocks and trees around the river, and how to use shading to create depth.
Whether you want to draw a peaceful river in the countryside, a winding stream through a forest, or a wide river in a landscape, these simple techniques will help you create a better drawing.
What You Need to Draw a River

You do not need expensive tools to start. A simple pencil and paper are enough.
Here are the basic materials:
- Drawing paper or sketchbook
- Pencil, preferably HB or 2B
- Eraser
- Sharpener
- Black pen or fineliner, optional
- Colored pencils, markers, or watercolor, optional
- Blending stump or tissue, optional
If you are drawing digitally, you can use any drawing app with a pencil brush, eraser, and soft shading brush.
Understand the Shape of a River First

Before drawing, look at how rivers appear in real life Most rivers do not move in a perfectly straight line. They curve, bend, widen, narrow, and disappear into the distance.
A natural river usually has:
- Curved banks
- A narrow section in the distance
- A wider section in the foreground
- Rocks, grass, trees, or bushes near the edge
- Reflections on the water
- Flow lines that follow the direction of the current
The most important rule is simple: a river should look wider near the viewer and narrower as it moves away. This creates perspective and makes the drawing feel deep.
Step by Step Guide to Draw a River
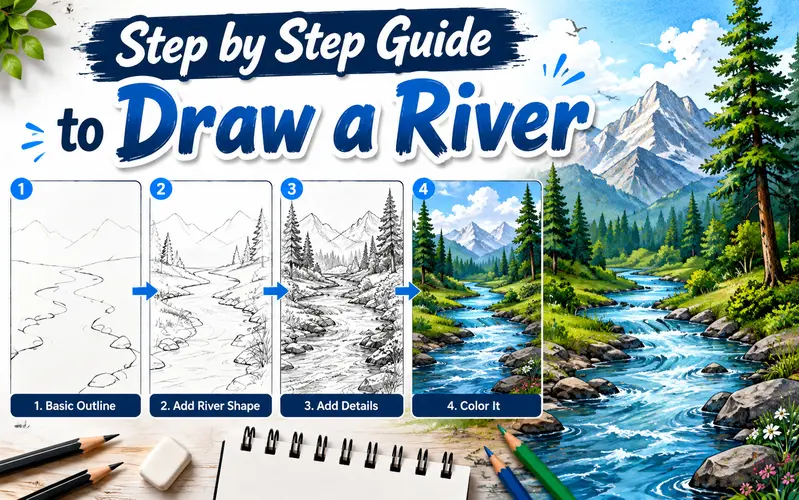
Step 1: Draw the Horizon Line
Start by drawing a light horizontal line across your paper. This is your horizon line. It shows where the land meets the sky in the distance.
Place the horizon line near the upper third of the paper if you want more space for the river and foreground. Do not press too hard with your pencil because you may erase or adjust this line later.
The horizon line helps you decide where the river will disappear. This point is important for creating depth in your river landscape drawing.
Step 2: Sketch the Basic River Shape
Now draw two long, curved lines starting near the horizon and moving toward the bottom of the page. These two lines are the riverbanks.
Make the lines close together near the horizon and farther apart in the foreground. This makes the river look like it is coming toward the viewer.
Do not make both sides perfectly even. Natural rivers are uneven. One side may curve more than the other. One bank may be steep, while the other may be flat.
Try to create a gentle “S” shape. This makes the river look more interesting than a straight line.
Step 3: Add Perspective to the River
Perspective is what makes your river look realistic. If the river is far away, it should look small and narrow. If it is close to you, it should look large and wide.
To improve perspective:
- Keep the distant river narrow
- Make the foreground river wider
- Draw smaller rocks and plants in the distance
- Draw larger rocks, grass, and details in the foreground
- Let the riverbanks slowly move toward one point near the horizon
This simple trick gives your drawing a strong sense of space.
Step 4: Draw the Riverbanks
Riverbanks are the edges of the river. They can be grassy, rocky, sandy, muddy, or covered with plants.
Lightly sketch the land on both sides of the water. Add uneven lines to make the banks look natural. Avoid clean, perfect edges. A real riverbank has bumps, small slopes, broken soil, stones, roots, and grass.
You can add:
- Short grass strokes
- Small rocks
- Muddy edges
- Tree roots
- Bushes
- Sand patches
- Small flowers
Make the foreground riverbank more detailed and the background riverbank simpler. This helps create depth.
Step 5: Add Rocks and Stones
Rocks make a river drawing more natural and interesting. They also help show the movement of water.
Place some rocks near the banks and a few inside the river. Do not arrange them in a perfect pattern. Nature looks random.
To draw a rock:
- Sketch an uneven oval or rounded shape.
- Add small cracks or rough edges.
- Shade one side darker.
- Leave the top area lighter.
- Add a small shadow under the rock.
If a rock is in the water, draw small curved lines around it. These lines show that the river current is moving around the object.
Step 6: Draw Water Flow Lines
Water flow lines are one of the easiest ways to make a river look alive. These lines show the direction of the current.
Draw light, curved horizontal lines across the river. Let the lines follow the shape of the river. If the river curves left, the water lines should also curve slightly left. If it curves right, the lines should follow that movement.
Keep these lines soft and light. Do not fill the whole river with too many lines. Too many marks can make the water look messy.
Use longer, smoother lines for calm water. Use shorter, broken lines for faster-moving water.
Step 7: Show Movement in the Water
A river is always moving, so your drawing should show motion.
You can show movement by adding:
- Curved lines around rocks
- Small ripples near the riverbank
- Broken lines in the center of the river
- White spaces for highlights
- Swirling lines in fast water
- Foam shapes near rapids
If the river is calm, use smooth, gentle lines. If the river is fast, use sharper, broken, energetic lines.
For rapids, draw small white foam shapes. These can look like tiny clouds, broken curves, or irregular patches. Add darker shading around the foam to make it stand out.
Step 8: Add Reflections
Reflections make your river drawing look more realistic. Water often reflects the sky, trees, rocks, and riverbanks.
To draw reflections, look at what is near the water. If there is a tree on the bank, draw a soft, wavy version of that tree in the water below it. If there are rocks, add small dark shapes near the water’s edge.
Reflections should not be too detailed. They are usually softer and more broken than the real object.
Tips for drawing reflections:
- Keep them slightly wavy
- Use horizontal strokes
- Make them darker near the bank
- Keep the center of the river lighter
- Do not copy every detail exactly
A good reflection should suggest the object, not repeat it perfectly.
Step 9: Shade the River
Shading gives your river depth and form. Without shading, the river may look flat.
Start by deciding where the light is coming from. If the light comes from the left, the right side of rocks, trees, and banks will be darker.
For the water:
- Keep bright areas light
- Shade near rocks and riverbanks
- Add darker tones under overhanging plants
- Use soft strokes for calm water
- Use stronger contrast for fast water
The middle of a river often reflects the sky, so it can be lighter. The edges are often darker because they reflect land, trees, and shadows.
Step 10: Add Grass, Trees, and Plants
A river looks better when it has a natural environment around it. Add grass, bushes, trees, reeds, or small plants along the riverbanks.
For grass, use short upward strokes. Vary the length so it does not look stiff. For bushes, use loose rounded scribbles. For trees, draw a trunk first, then add branches and leafy shapes.
Place larger plants in the foreground and smaller ones in the distance. This makes your river landscape drawing feel more realistic.
You can also add reeds near the water. Draw thin vertical lines with small leaves. Reeds are great for making the edge of the river look natural.
Step 11: Create Depth in the Background
A river often looks better when it sits inside a full landscape. Add distant hills, mountains, trees, clouds, or a small bridge.
Keep background elements light and simple. Do not add too much detail far away. Objects in the distance should look softer and smaller.
You can draw:
- Small hills near the horizon
- A distant tree line
- Light clouds in the sky
- A path beside the river
- A bridge crossing the water
- Mountains behind the river
These details help tell a story and make your river drawing more complete.
Step 12: Clean Up Your Sketch
Once the main shapes are finished, erase extra guidelines. Clean the horizon line if it is too dark. Lighten any rough sketch marks that are no longer needed.
Now sharpen important edges. Add darker lines to the closest rocks, banks, and foreground details. Keep distant lines lighter.
This contrast helps guide the viewer’s eye. The foreground should look clearer, while the background should feel softer.
Step 13: Add Final Details
Final details bring your river drawing to life.
You can add:
- Tiny ripples in the water
- Small pebbles near the edge
- Dark shadows under rocks
- Grass blades overlapping the riverbank
- Tree reflections
- Foam in fast water
- Birds in the sky
- A small boat or wooden bridge
Do not overdo it. A few well-placed details are better than too many random marks.
How to Draw a Calm River
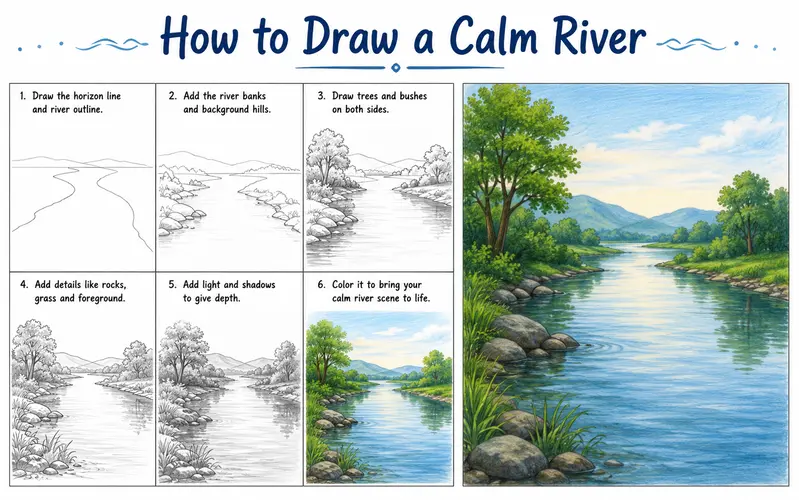
A calm river has smooth water and gentle reflections. Use long, soft horizontal lines. Keep the water surface clean and open. Add light reflections of trees or clouds.
Avoid sharp, broken marks. Calm water should feel peaceful and quiet.
Best features for a calm river drawing:
- Smooth riverbanks
- Soft shading
- Clear reflections
- Wide open water
- Gentle ripples
How to Draw a Fast River

A fast river needs more energy. Use short, broken, curved lines. Add foam around rocks and rapids. Make the water lines move in the same direction as the current.
Best features for a fast river drawing:
- Jagged rocks
- White foam
- Strong contrast
- Swirling lines
- Uneven banks
- Splash marks
A fast river should feel active, loud, and powerful.
Common Mistakes Beginners Make

Many beginners make the same mistakes when learning how to draw a river. Avoid these, and your drawing will improve quickly
Making the River Too Straight
A perfectly straight river looks unnatural. Add curves and bends to make it more realistic.
Drawing Both Banks the Same
Nature is uneven. Make one side slightly different from the other.
Adding Too Many Water Lines
Too many lines can make the river look busy. Use fewer, cleaner strokes.
Forgetting Perspective
The river should be narrow in the distance and wider in the foreground.
Ignoring Reflections
Reflections help water look real. Add soft reflections near trees, rocks, and banks.
Making the Background Too Detailed
Keep distant objects simple. Save strong detail for the foreground.
Easy Composition Ideas for a River Drawing
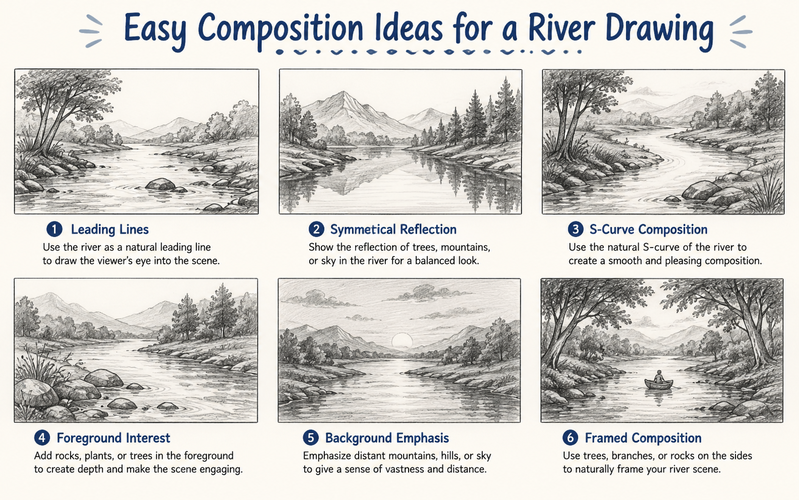
If you do not know how to design your river scene try one of these ideas:
- A river flowing through a forest
- A river beside a mountain path
- A calm river under a wooden bridge
- A rocky river with small rapids
- A wide river at sunset
- A stream flowing through grassland
- A river disappearing into distant hills
For a strong composition, let the river lead the viewer’s eye into the picture. A winding river works like a visual path.
How to Color a River Drawing
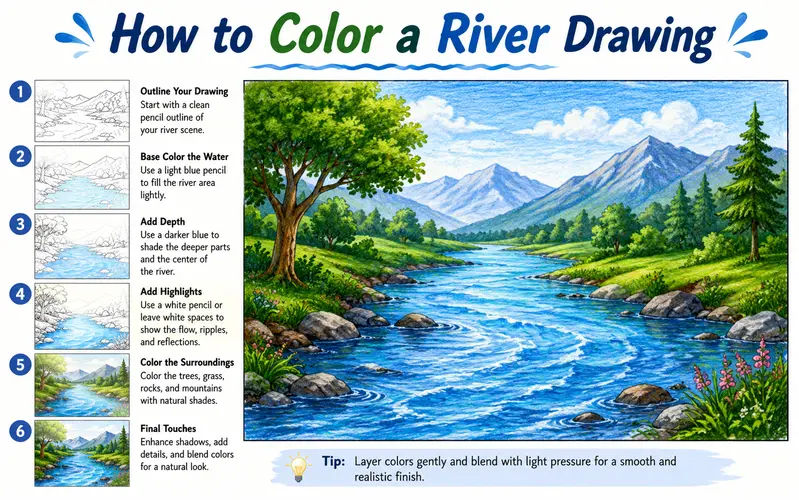
If you want to add color, remember that water is not always blue. Water reflects its surroundings.
Use:
- Light blue for sky reflection
- Green near trees and grass
- Brown near muddy banks
- Gray near rocks
- White for highlights and foam
- Dark blue or purple for shadows
Keep the center of the river lighter if it reflects the sky. Add darker colors near the edges where the river reflects land and plants.
Blend colors softly. Hard color edges can make the water look flat.
Quick Tips to Make Your River Drawing Better

Use these simple tips to improve your final artwork:
- Draw the river wider in the foreground
- Use curved lines to show flow
- Keep water lines light and clean
- Add rocks to break up the surface
- Shade near the banks for depth
- Add reflections, but keep them soft
- Use grass and plants to frame the river
- Keep distant details smaller and lighter
- Leave white spaces for shine and foam
- Step back and check the whole drawing before finishing
FAQs About How to Draw a River
Is drawing a river easy for beginners?
Yes, drawing a river is easy when you start with simple curved lines, then add banks, rocks, water flow, and shading step by step
How do you make a river look realistic?
Make the river narrow in the distance and wider in the foreground. Add reflections, soft ripples, shadows, rocks, and natural riverbanks.
What is the best shape for a river drawing?
A gentle “S” shape works best because most rivers curve naturally instead of flowing in a straight line.
How do you draw flowing water in a river?
Use light curved lines that follow the direction of the river. Add broken lines around rocks to show movement.
How do you draw river reflections?
Draw soft, wavy horizontal shapes under trees, rocks, or riverbanks. Keep the reflections lighter and less detailed than the real objects.
What color should I use for a river?
Use light blue for sky reflection, green near trees, brown near muddy banks, gray near rocks, and white for highlights or foam.
How do you draw rocks in a river?
Draw uneven rounded shapes, shade one side, leave the top lighter, and add small curved water lines around each rock.
Final Thoughts
Learning how to draw a river is really about learning how to show shape, movement, and depth. Start with two curved riverbank lines. Add perspective by making the river narrow in the distance and wide in the foreground. Then build the scene with rocks, grass, trees, reflections, shadows, and flowing water lines.
You do not need to make the drawing perfect. A natural river should look a little uneven and free. The more you practice the easier it becomes to draw water that feels alive.
Start with a simple river sketch today. Then try different versions: a calm river, a rocky stream, a forest river, or a fast river with rapids. Each drawing will teach you something new.