How to Screenshot on Chromebook If you are using a Chromebook for the first time, one of the most common things you will need is the ability to take a screenshot. Whether you are a student saving notes, a professional capturing information, or just someone sharing something online, screenshots are extremely useful in everyday life.
However, many users get confused when they try to take a screenshot on a Chromebook because the keyboard layout is slightly different from Windows and Mac laptops. Keys like “Print Screen” are missing, and instead ChromeOS uses special shortcut keys and built-in tools.
The good news is that once you understand the basic methods, taking a screenshot on a Chromebook becomes very easy and fast. You can capture your entire screen, a selected area, or even a single window in just a few seconds.
In this complete guide you will learn every possible method of taking screenshots on Chromebook. This includes keyboard shortcuts, screen capture tools, tablet mode, external keyboards, editing options, saving locations, troubleshooting, and advanced tips that most guides do not explain clearly.
By the end of this article, you will be able to take screenshots on any Chromebook without any confusion.
What is a Screenshot?
A screenshot is a digital image of whatever is currently displayed on your screen. It captures exactly what you see at that moment.
Screenshots are useful for:
- Saving important information
- Sharing error messages with support
- Creating tutorials or guides
- Saving online content
- School or office work
On Chromebooks, screenshots are automatically saved as image files, usually in PNG format.
Quick Methods (Fast Overview)
If you are in a hurry, here are the main Chromebook screenshot shortcuts:
- Full screen: Ctrl + Show Windows
- Partial screen: Shift + Ctrl + Show Windows
- Window screenshot: Ctrl + Alt + Show Windows
- Tablet mode: Power + Volume Down
- External keyboard full screen: Ctrl + F5
- External keyboard partial: Ctrl + Shift + F5
Now let’s understand each method in detail.
Understanding the Chromebook Keyboard
Before taking screenshots, you need to understand one important key.
Show Windows Key
The Show Windows key is unique to Chromebooks. It:
- Looks like a rectangle with two vertical lines
- Is usually located in the top row
- Replaces the “F5” or “Print Screen” key
If you are using a normal external keyboard, you can use F5 instead.
This key is essential for most screenshot shortcuts.
Method 1: How to Take a Full Screenshot
This is the most common and easiest method.
Steps
- Press Ctrl + Show Windows
- Your screen will flash once
- A screenshot is automatically taken
- File is saved in Downloads folder
When to use it:
- Saving entire webpage
- Capturing full desktop
- Saving complete documents
This method is fast and requires only one shortcut.
Method 2: How to Take a Partial Screenshot
Sometimes you don’t need the whole screen. You only want a specific part.
Steps
- Press Shift + Ctrl + Show Windows
- Your cursor changes into a cross shape
- Click and drag to select area
- Release mouse to capture
Why this is useful:
- No need to crop later
- Clean and focused screenshots
- Saves time in editing
This is one of the most used features for students and professionals.
Method 3: How to Take a Window Screenshot
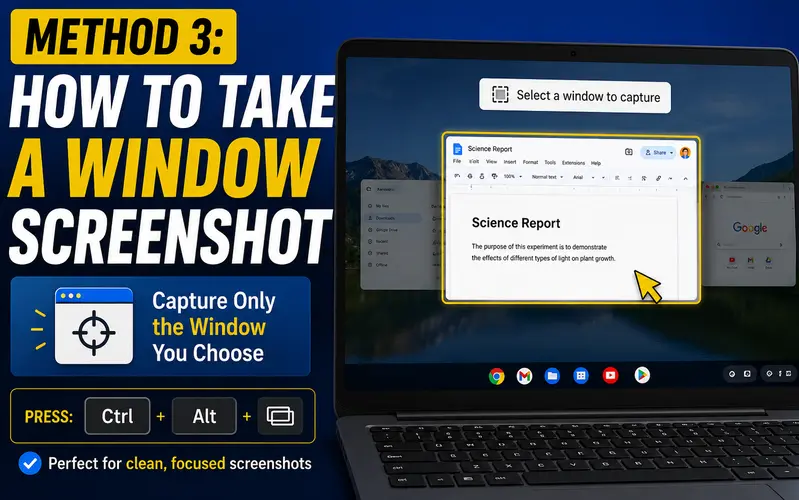
This method captures only one active window.
Steps:
- Press Ctrl + Alt + Show Windows
- Click the window you want to capture
- Screenshot will be saved automatically
Best for:
- Clean presentations
- Office work
- App tutorials
It avoids background clutter and gives a professional result.
Method 4: Using Screen Capture Tool
Chromebook also has a built-in Screen Capture tool which is more powerful than shortcuts.
How to open it
- Click on the time at bottom-right corner
- Open Quick Settings
- Click on “Screen Capture”
Options available
- Full screen capture
- Partial capture
- Window capture
- Screen recording
Extra features
- Timer option
- Microphone recording
- Save location settings
This method is best for users who want more control.
Method 5: Screenshot in Tablet Mode
If your Chromebook is in tablet mode, keyboard shortcuts will not work.
Steps:
- Press Power button + Volume Down
- Screen flashes
- Screenshot is saved automatically
Best for:
- 2-in-1 Chromebooks
- Touch-only usage
- Mobile-style usage
This method is similar to Android phones.
Method 6: Using External Keyboard
If you use a desktop-style keyboard, shortcuts change slightly.
Shortcuts:
- Full screen: Ctrl + F5
- Partial screen: Ctrl + Shift + F5
This replaces the Show Windows key.
Where Screenshots are Saved
By default, all screenshots go to:
Downloads folder
How to find:
- Open Files app
- Click Downloads
- Find your screenshot
File type:
- PNG image
- Named with date and time
You can rename files for better organization.
How to Change Screenshot Save Location
Many users don’t know this feature.
Steps:
- Open Screen Capture tool
- Click Settings (gear icon)
- Choose “Change folder”
- Select new location
You can save to:
- Google Drive
- Internal folders
- External storage
This is very useful for students and office users.
How to Edit Screenshots on Chromebook
Chromebooks come with basic editing tools.
Editing options:
- Crop image
- Rotate image
- Adjust brightness
- Add annotations
Steps:
- Open Files app
- Click screenshot
- Open in Gallery
- Edit and save
For advanced editing, you can use online tools or Android apps.
How to Take Scrolling Screenshots
Chromebook does NOT have built-in scrolling screenshots.
Solution: Use Extensions
- GoFullPage
- FireShot
- Awesome Screenshot
These tools allow full webpage capture.
How to Record Screen on Chromebook
Screen recording is built into ChromeOS.
Steps:
- Open Screen Capture tool
- Switch to Video mode
- Select recording area
- Click Record
Uses:
- Tutorials
- Online classes
- Presentations
How to Share Screenshots
After capturing, sharing is simple.
Options:
- Google Drive
- Messaging apps
- Drag and drop
Quick method:
Click screenshot preview and use share button.
Common Problems and Fixes

Screenshot not working
- Restart Chromebook
- Check updates
- Try Screen Capture tool
Blurry screenshots
- Avoid zooming before capture
- Use partial screenshot
File not saving
- Check storage space
- Change save location
Shortcut not working
- Use external keyboard method
- Use Screen Capture tool
Security Limitations
Chromebook blocks screenshots in:
- Login screen
- Some secure apps
- DRM protected content
This is for privacy and security protection.
FAQs – How to Screenshot on Chromebook
Can I take a screenshot on Chromebook quickly?
Yes, you can quickly take a screenshot using Ctrl + Show Windows for full screen capture.
Where do screenshots go on Chromebook?
Screenshots are automatically saved in the Downloads folder inside the Files app.
Can I take a screenshot without keyboard?
Yes, use the Screen Capture tool from Quick Settings or use Power + Volume Down in tablet mode.
How do I take a partial screenshot?
Press Shift + Ctrl + Show Windows, then drag and select the area you want.
Why is my screenshot not working?
It may be due to outdated ChromeOS, keyboard issues, or storage problems. Restart your device or try Screen Capture tool.
Can I edit screenshots on Chromebook?
Yes, you can crop, rotate, and adjust screenshots using the built-in Gallery app.
Can I take scrolling screenshots on Chromebook?
No, ChromeOS does not support scrolling screenshots natively. You need extensions like GoFullPage.
Are screenshots allowed in all apps?
Most apps allow screenshots, but some secure apps and login screens may block them for privacy reasons.
Conclusion
Learning how to screenshot on Chromebook is very simple once you understand the different methods available. ChromeOS gives you multiple options, including keyboard shortcuts, screen capture tools, tablet mode, and external keyboard support.
For quick use, shortcuts are best. For advanced control, Screen Capture tool is ideal. And for touch devices, tablet mode works perfectly.
Once you practice these methods, taking screenshots will become a natural and fast part of your workflow.