
How to use smart guides in powerpoint have you ever spent 10 minutes trying to eyeball whether two shapes are perfectly centered on a slide That frustration ends today.
PowerPoint has a built-in feature called Smart Guides that does the heavy lifting for you. It shows you real-time alignment lines as you drag objects around a slide so you can place everything pixel-perfectly without guessing. Whether you are building a simple presentation or designing a detailed infographic professional results are only a few seconds away.
This guide covers everything from turning Smart Guides on to using them like a pro. You will also find tips that most other articles skip entirely.
What Are Smart Guides in PowerPoint

Smart Guides are dynamic dotted or dashed lines that appear automatically when you move an object on a slide. They pop up the moment an object lines up with another object the edge of the slide or the center of the slide.
They are different from static guides which you place manually. Smart Guides are intelligent. They react in real time to where you are dragging something and disappear the moment you stop moving.
When Smart Guides are active you will notice two types of lines:
- Alignment lines that show when edges or centers match between objects
- Spacing lines that show when equal distance exists between three or more objects
The result is a slide where every element looks intentional and balanced.
Why Smart Guides Matter for Your Presentations
Misaligned objects make slides look careless even when the content is excellent. Your audience picks up on visual inconsistencies immediately even if they cannot name what feels off.
Using Smart Guides gives you three real advantages:
- You save time because you stop manually adjusting positions by tiny increments
- Your slides look polished and professional without needing a design background
- Your audience focuses on your message rather than being distracted by uneven spacing or crooked shapes
Smart Guides are especially useful for anyone building pitch decks infographics photo layouts resume slides or data-heavy presentations.
How to Turn On Smart Guides in PowerPoint
Smart Guides are usually on by default but if they are not showing follow these steps to enable them.
- Step 1. Open PowerPoint and go to the View tab in the ribbon at the top.
- Step 2. In the Show group click the small diagonal arrow to open the Grid and Guides dialog box.
- Step 3. In the dialog box look for the option that says Display smart guides when shapes are aligned and make sure the checkbox is ticked.
- Step 4. Click OK to save your setting.
That is it. Smart Guides are now active and will appear automatically whenever you move objects on any slide.
Note for Mac users: The path is the same. Go to View and look for Guides in the Show group. The Grid and Guides dialog works identically on Mac.
How to Use Smart Guides When Moving Objects
Once Smart Guides are enabled using them is effortless.
- Step 1. Click on any object on your slide such as a shape text box or image.
- Step 2. Start dragging it across the slide.
- Step 3. As you move the object red or orange dashed lines will appear. These lines tell you when your object is aligned with something else on the slide.
- Step 4. When the lines appear release your mouse. Your object is now perfectly aligned.
The lines show alignment with:
- The left edge center or right edge of another object
- The top middle or bottom of another object
- The horizontal center of the entire slide
- The vertical center of the entire slide
- The edges of the slide itself
You do not have to do any math. PowerPoint shows you exactly when alignment is perfect.
How to Use Smart Guides to Space Objects Evenly
This is one of the most useful things Smart Guides do and most people do not know about it.
When you have three or more objects on a slide Smart Guides will show you when the middle object is exactly equidistant from the two outer ones. This saves you from using the Distribute feature in the ribbon for quick adjustments.
Here is how to do it:
- Step 1. Place two objects on your slide at the positions you want them to stay.
- Step 2. Click and drag a third object toward the space between them.
- Step 3. Smart Guides will show spacing indicators as small arrows or bracket-like lines between the objects. When those lines appear the spacing is even.
- Step 4. Release your mouse.
All three objects are now evenly spaced without a single formula or menu click.
Pro tip: This works with four or more objects too. Keep dragging additional objects until the spacing indicators appear for each gap.
Aligning Objects to the Slide Center Using Smart Guides
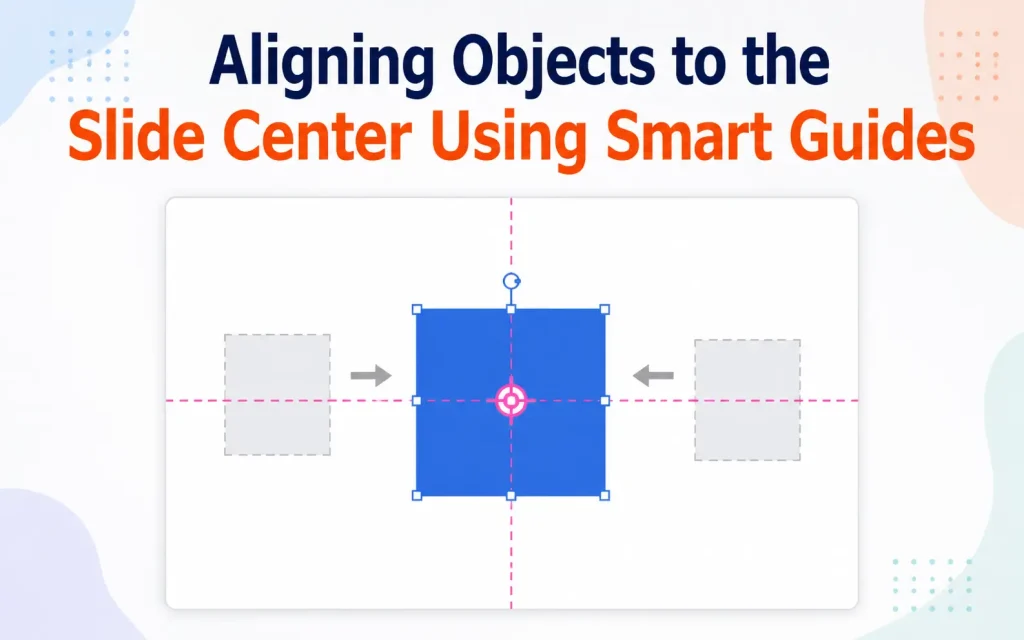
Centering a single object on a slide is one of the most common presentation tasks. Smart Guides make it instant.
- Step 1. Click and drag your object slowly toward the middle of the slide.
- Step 2. Watch for a long dashed line that runs across the full width of the slide horizontally or the full height of the slide vertically.
- Step 3. When both lines appear simultaneously your object is at the exact center of the slide.
- Step 4. Release your mouse.
This is faster than using the Align to Slide option in the ribbon because you can see it happen live as you drag.
How to Temporarily Disable Smart Guides
There are moments when Smart Guides work against you. Maybe you need to place an object slightly off-center on purpose or you are making a fine micro-adjustment.
To turn off Smart Guides temporarily without going into settings hold down the Alt key on Windows or the Option key on Mac while dragging. Smart Guides will not fire for that single drag action.
As soon as you release the key Smart Guides return to normal behavior for your next move.
This is one of the most useful shortcuts that competitor articles miss entirely. It saves you from constantly toggling Smart Guides on and off in settings.
Smart Guides vs Static Guides vs Gridlines
Many users confuse these three tools. Here is a clear breakdown:
- Smart Guides appear automatically while you drag. They react to other objects on the slide. You do not set them up manually. They are perfect for quick alignment and spacing during active slide building.
- Static Guides are lines you place yourself by dragging from the ruler. They stay in place until you delete them. They are ideal when you want a consistent reference line across multiple slides such as a fixed margin or a logo position.
- Gridlines are a dotted grid that covers your entire slide. They give you a general sense of spacing and layout but they do not snap intelligently to other objects the way Smart Guides do.
- The best approach is to use Smart Guides for daily work and add Static Guides or Gridlines only when you need a consistent structural reference across many slides.
Smart Guides Not Showing Up: How to Fix It
If you are moving objects and no lines appear try these fixes in order:.
- Fix 1. Make sure Smart Guides are enabled. Go to View and open the Grid and Guides dialog. Confirm the Smart Guides checkbox is ticked.
- Fix 2. Check that Snap to Grid is not overriding Smart Guides. If Snap to Grid is on with a large grid spacing your objects may be jumping to grid positions instead of responding to Smart Guide alignment. Lower the grid spacing or turn off Snap to Grid temporarily.
- Fix 3. Make sure there are at least two objects on the slide. Smart Guides need something to align to. They will not appear when only one object exists on the slide unless it is aligning to the slide edges or center.
- Fix 4. Restart PowerPoint. Occasionally a software glitch can prevent Smart Guides from displaying. A quick restart fixes this.
Practical Uses of Smart Guides Beyond Basic Alignment
Smart Guides are not just for dragging shapes into rows. Here are some real-world scenarios where they shine:
- Building icon grids: When you have a row of icons Smart Guides tell you when each one is vertically aligned and evenly spaced at the same time. You can build a perfect three-by-three or four-by-four grid without any ruler measurements.
- Aligning text boxes in multi-column layouts: If you are creating a two-column or three-column layout Smart Guides help you ensure each column starts at the same top edge and has consistent spacing between columns.
- Placing logos consistently: When adding a company logo to multiple slides Smart Guides let you drop it in the same position every time without needing a static guide.
- Creating timelines: Smart Guides show you when timeline milestone markers are evenly spaced horizontally so your timeline looks clean and proportional.
Designing comparison tables manually: If you are building a comparison layout with shapes instead of a table Smart Guides align each row and column perfectly.
Keyboard Shortcuts That Work with Smart Guides
Combining Smart Guides with keyboard shortcuts makes you significantly faster:
- Alt key (Windows) or Option key (Mac): Hold while dragging to temporarily disable Smart Guides for precise free placement.
- Shift key while dragging: Constrains movement to horizontal or vertical only. Smart Guides still fire so you get perfect straight-line alignment.
- Ctrl plus drag (Windows) or Option plus drag (Mac): Duplicates an object as you drag. Smart Guides activate on the duplicate so you can instantly place a copy in perfect alignment with the original.
- Arrow keys after placing: Once an object is roughly in place use the arrow keys to nudge it. Smart Guides do not fire during keyboard nudging so this is ideal for the final micro-adjustment after Smart Guide placement
Smart Guides on Different Versions of PowerPoint
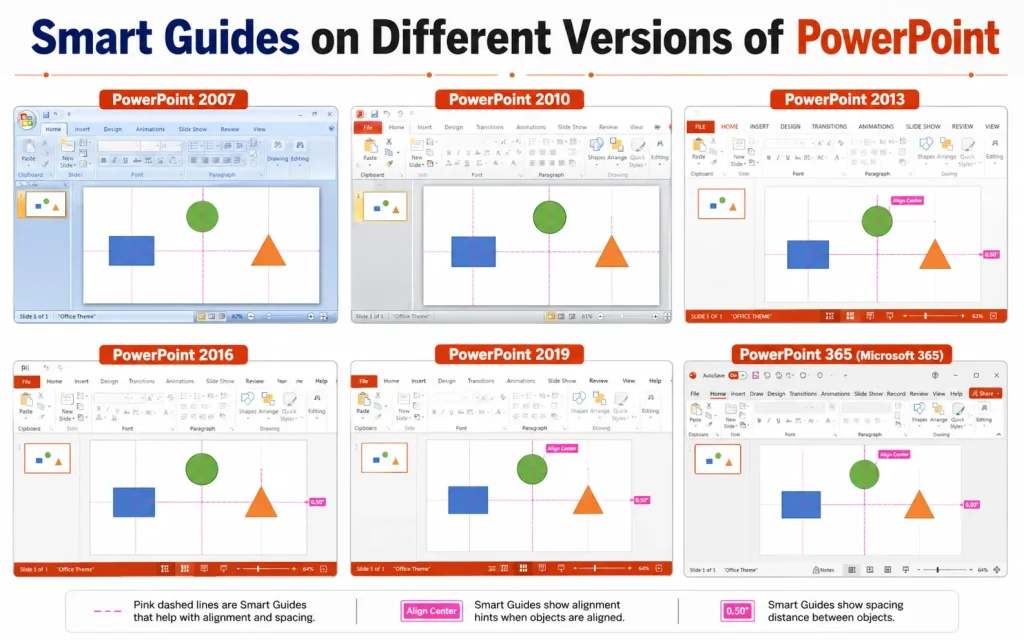
Smart Guides work across all modern versions of PowerPoint but the interface looks slightly different depending on your version.
- PowerPoint 2016 2019 2021 and Microsoft 365: The View tab contains the Show group with a diagonal arrow for Grid and Guides. Smart Guides checkbox is inside that dialog.
- PowerPoint for Mac (all recent versions): The path is identical to Windows. View tab and then the Show group.
- PowerPoint Online (web browser): Smart Guides are available but the feature set is slightly limited compared to the desktop app. The real-time spacing indicators may not appear in all scenarios.
- PowerPoint for iPad and iPhone: Smart Guides work on mobile but the experience is touch-based. Objects snap visually when they align rather than showing the full set of dashed alignment lines.
If you are on an older version such as PowerPoint 2013 Smart Guides still exist but you may need to look under the File menu and then Options and then Advanced to find the display settings.
Common Mistakes to Avoid When Using Smart Guides
- Relying only on Smart Guides for multi-slide consistency: Smart Guides help within a single slide. If you need the same element positioned identically across 20 slides use a Slide Master or static guides instead.
- Ignoring spacing indicators: Most users notice the alignment lines but miss the spacing indicators. Pay attention to the bracket-style markings between objects. Those are telling you about even spacing which is just as important as alignment.
- Moving too fast: Smart Guides fire for a fraction of a second. If you drag quickly you may miss the indicator. Slow down your drag when you are approaching the position you want.
- Not using grouping first: If you have a cluster of objects that you want to move together as a unit group them first with Ctrl plus G. Then Smart Guides will fire relative to the group as a whole giving you cleaner alignment results.
Smart Guides at a Glance
Smart Guides are one of the fastest ways to improve the visual quality of your PowerPoint slides. They work automatically once enabled and require no special skill to use. The key things to remember are
- Enable them through View and then Grid and Guides
- Watch for both alignment lines and spacing indicators
- Hold Alt or Option to override them temporarily
- Use them alongside grouping and keyboard shortcuts for maximum speed
- Switch to static guides or Slide Master when you need cross-slide consistency
Once you start using Smart Guides you will never go back to eyeballing alignment again.
FAQs
What are Smart Guides in PowerPoint?
Smart Guides are visual alignment tools that appear automatically when you move objects on a slide. They help you align shapes, images, text boxes, and other elements precisely.
How do I enable Smart Guides in PowerPoint?
Go to View on the ribbon and check the Guides option. Smart Guides are usually enabled by default, but you can verify their settings through the PowerPoint options menu.
Why are Smart Guides not showing in PowerPoint?
Smart Guides may not appear if they are disabled in PowerPoint settings or if the object placement does not trigger alignment suggestions. Ensure the feature is turned on and try moving objects closer together.
Can Smart Guides help with object spacing?
Yes, Smart Guides display spacing indicators that help distribute objects evenly across a slide, creating a cleaner and more professional layout.
Do Smart Guides work with images and shapes?
Yes, Smart Guides work with images, shapes, icons, charts, text boxes, and most other objects inserted into a PowerPoint slide.
What is the difference between Guides and Smart Guides in PowerPoint?
Regular Guides are fixed reference lines that you place manually, while Smart Guides appear automatically as you move objects and provide real-time alignment assistance.
Can I customize Smart Guides in PowerPoint?
PowerPoint offers limited customization for Smart Guides. However, you can adjust related alignment and grid settings to better suit your workflow.
Final Thought
Learning how to use Smart Guides in PowerPoint is one of the simplest ways to improve the quality and professionalism of your presentations. These built-in alignment tools help you position text boxes, images, shapes, charts, and other slide elements with precision, eliminating the guesswork that often leads to cluttered or uneven layouts. Instead of manually adjusting objects multiple times smart Guides provide instant visual feedback, making it easier to create balanced and visually appealing slides whether you’re designing a business presentation, academic project, marketing pitch, or training material, Smart Guides can save valuable time while ensuring consistency throughout your slides.
They help maintain equal spacing, align objects accurately, and create a cleaner overall design that is easier for your audience to follow. Even small improvements in alignment can make a significant difference in how polished and credible your presentation appears.
You May Also Like It:
How to Write Effective Mini Guides
How to Add Guides in Illustrator
How Is It Possible for Ski Jumpers to Stay in the Air So Long and How Do They Train for That?